
18
72
Phil Jacobs Design
Course Distance
Opened for play in 1988, the Tampines course has undergone a redevelopment in 2017 by Phil Jacobs Design. This 18-hole par 72 championship course was officially opened for play on 23 February 2019. With its beautiful rolling hills and large greens, this course promises a fun, challenging and memorable experience for all level of golfers.
Download scorecardSelect Hole
Hole 1
The opening hole plays slightly downhill with two fairway bunkers to the left, that will challenge the long-hitter. A small lake will have your full attention to the right of this long kidney-shaped green. Conservative play can be to the front of the green, however also note the bunkers left of the green.
Distance
The aerial video is for general reference only and may not accurately reflect the current course layout.
Hole 2
This is a very long hole where the narrow fairway is framed by trees to the left and right. Only two lengthy and accurate shots will find the softly undulated putting surface. The right front of the green is guarded by a bunker while the area to the left of the green offers a bailout area.
Distance

The aerial video is for general reference only and may not accurately reflect the current course layout.
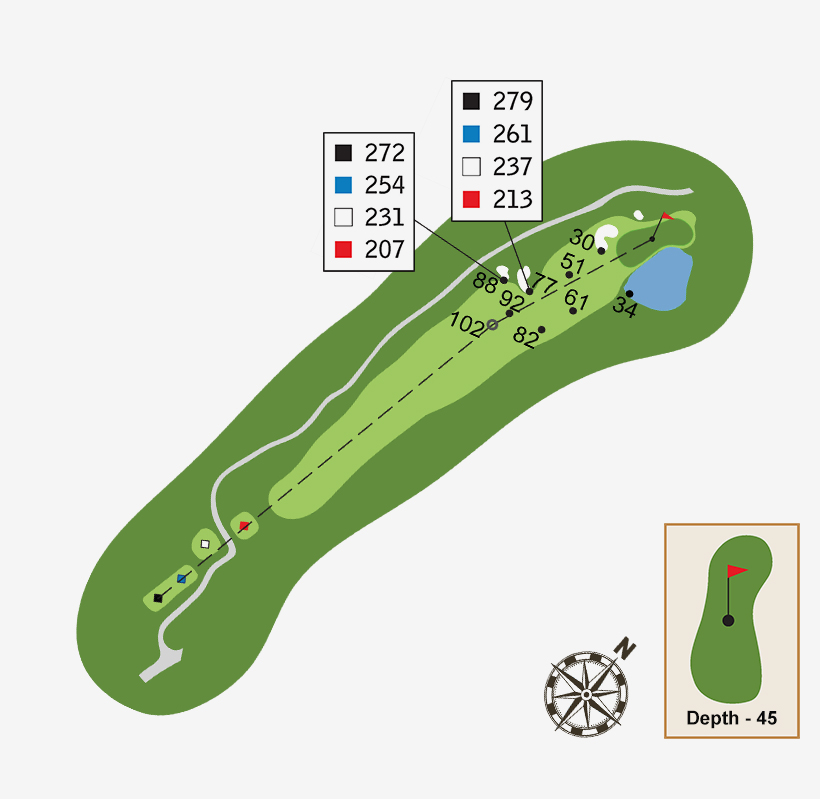
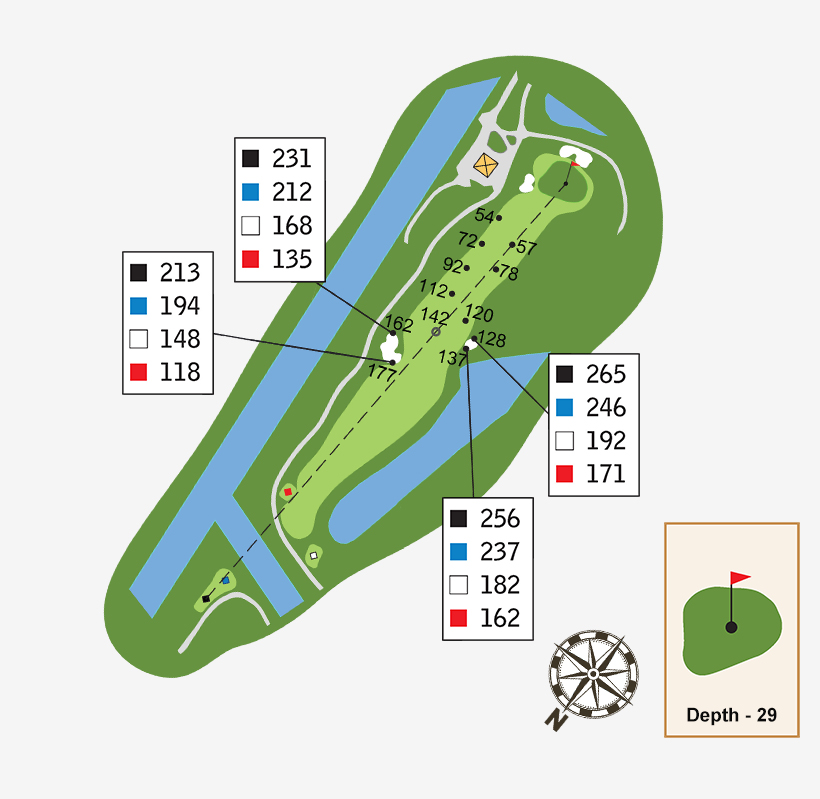
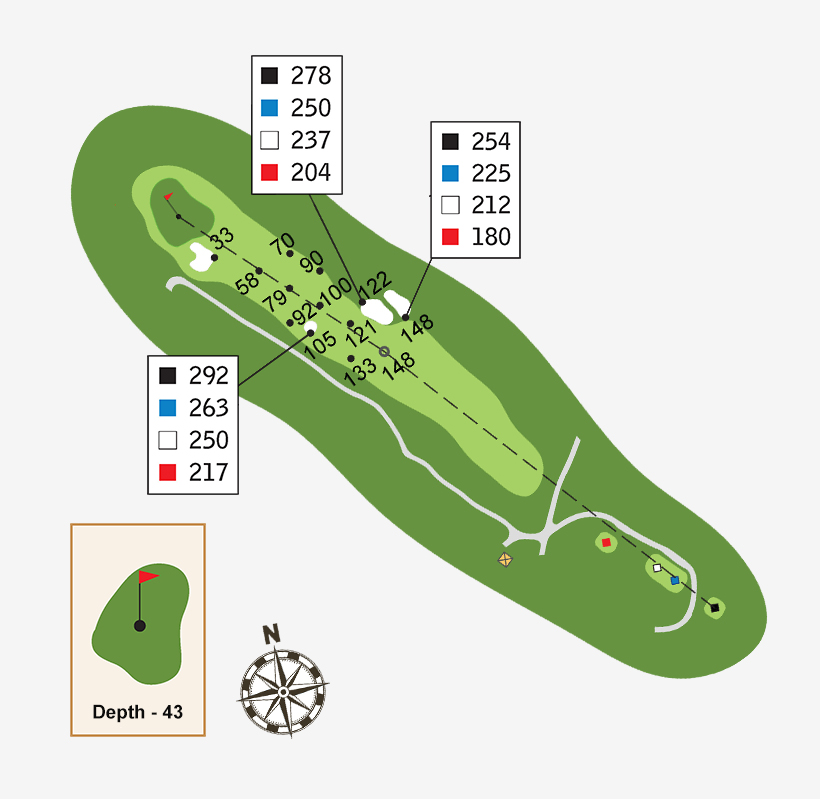
Hole 3
A dogleg hole to the left that features a lake from tee to green and there are no fairway bunkers. Left greenside bunker creates an optical illusion as it appears to be at the left front edge of the green when it is in fact 15m short. The green has some strong contours allowing different flag locations. A demanding hole when playing into the wind.
Distance
The aerial video is for general reference only and may not accurately reflect the current course layout.
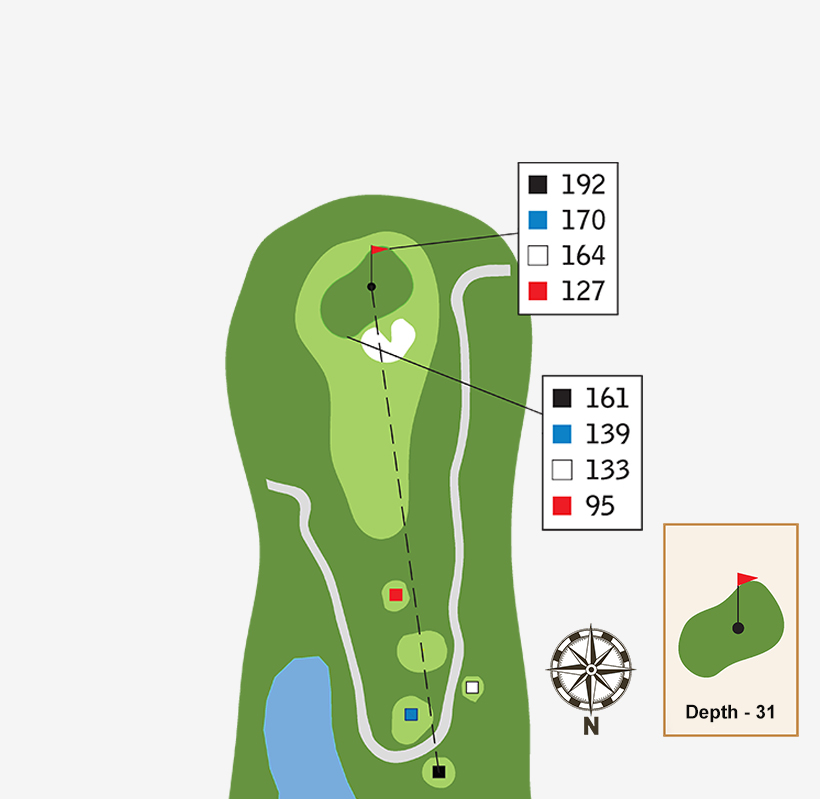
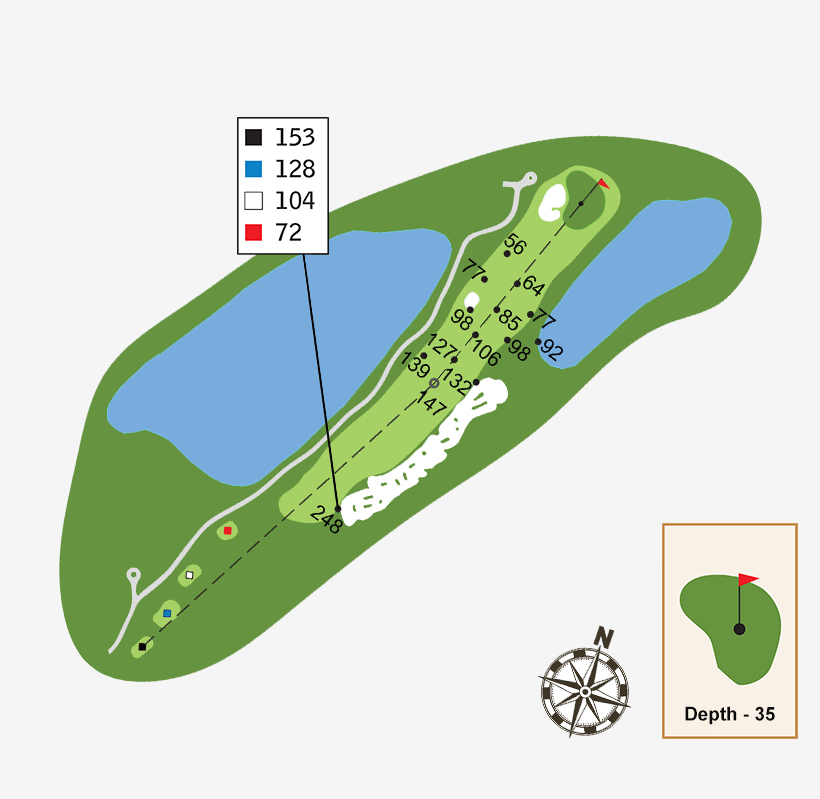
Hole 4
This is the longest par three on the course. Set up to resemble a Redan style green whereby the green is set at 45 degrees to the line of play. Not only is the hole long, the green can also be demanding, depending on where the flag is located. A bunker at the left front of the green hides the back left side pin positions. A par on this hole will always be a good score.
Distance
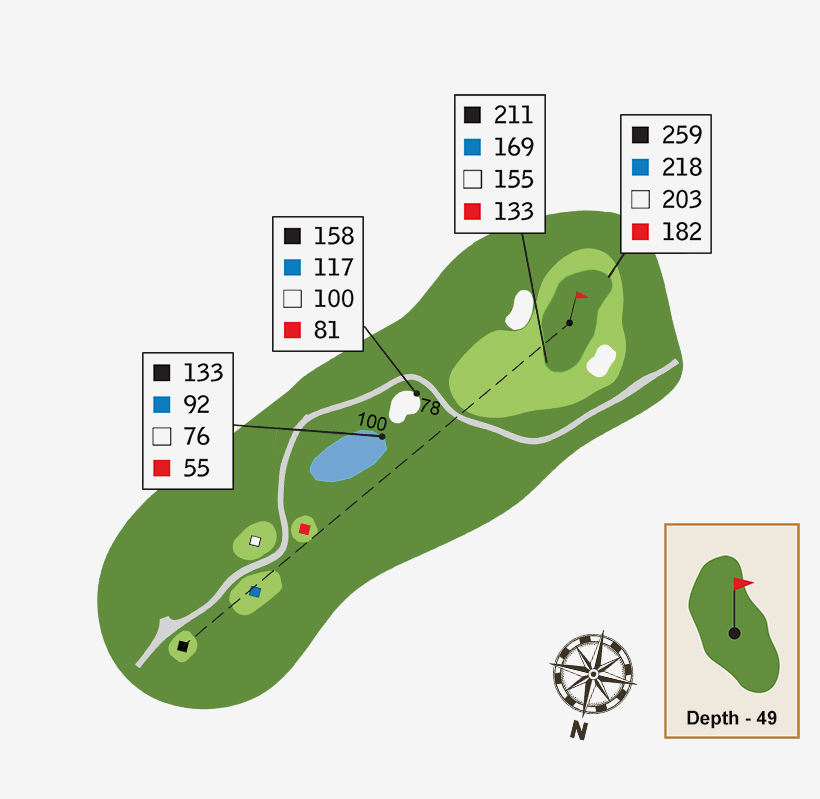
The aerial video is for general reference only and may not accurately reflect the current course layout.
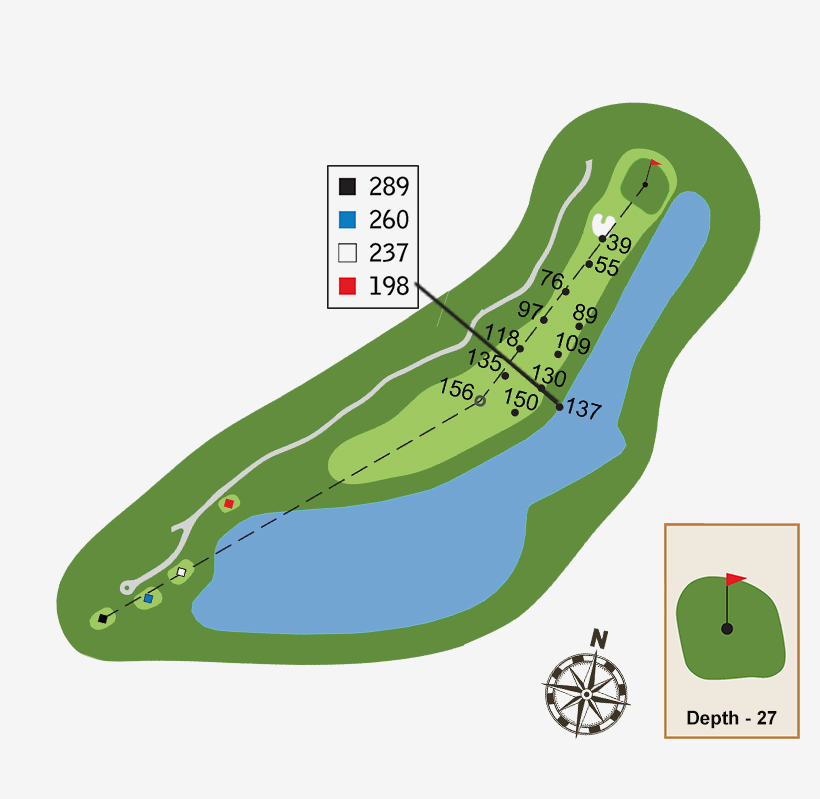
Hole 5
The shot requires the golfer to cross a canal between the first landing area and the second landing area. The tee shot is challenged by bunkers to the right and one to the left. A narrow bunker to the left will get the golfers’ attention on the second shot. The green is somewhat small and offers easy to difficult flag locations.
Distance
The aerial video is for general reference only and may not accurately reflect the current course layout.
Hole 6
View from the tee does not allow you to see the bottom of the flag and the green is raised around 6m higher than the tee. The main feature of the putting surface is a pronounced valley that separates the left from the right side of the green along with the fantastic views across the golf course.
Distance

The aerial video is for general reference only and may not accurately reflect the current course layout.
Hole 7
A large fairway bunker on the left and a small bunker and lake down the right frames provide a testing tee shot. A pronounced mound in the centre of the fairway, just past the landing area, brings strategic golf into play. Being to the left or right allows the golfer to clearly see the green. The green is a subtle two-level surface with the left side higher. Crosswinds will make this hole play tricky.
Distance
The aerial video is for general reference only and may not accurately reflect the current course layout.
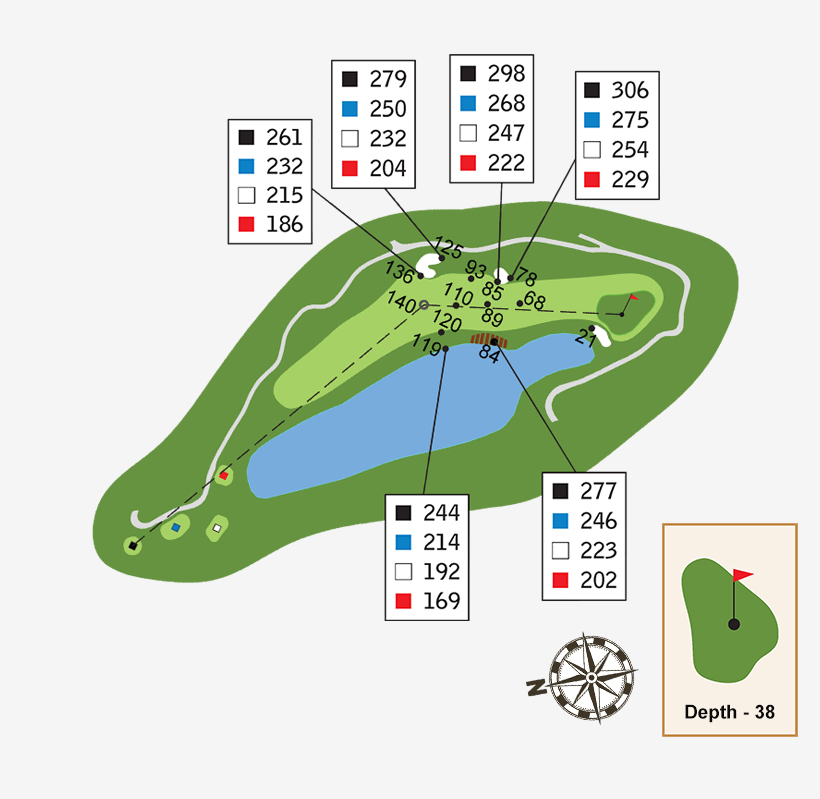
Hole 8
The golfer is offered a wide fairway off the tee, however the right side of the fairway offers the best angle of play around this soft dogleg to the left. However, be aware of the water on the right when playing a fade shot. On the second shot, the golfer will need to decide on either laying up short of cross bunker in the second landing area or carrying the cross bunkers. Shots to the left bring trees into play. The green has a soft shelf slope across the centre offering interesting flag locations.
Distance
The aerial video is for general reference only and may not accurately reflect the current course layout.
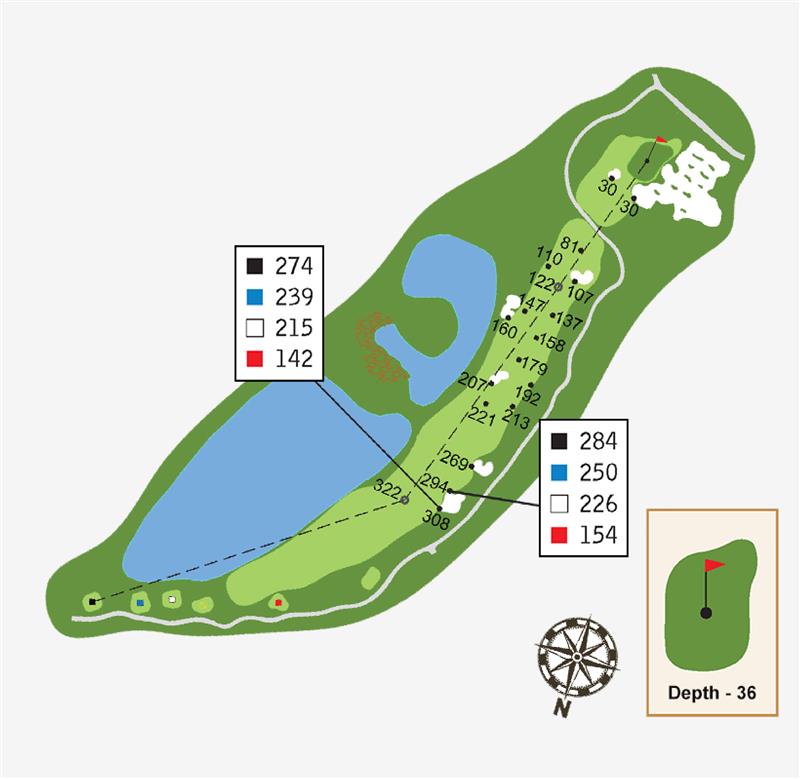
Hole 9
The shortest par-four on the course permits a risk-and-reward option on the tee shot. The long-hitter can reach the green but if not accurate a tricky second shot awaits. The green is a double tier with the back left flag location the most interesting. A large bunker between this green and green 18 with an added placement of ‘church pews’, makes for a picturesque view from the greens and clubhouse.
Distance
The aerial video is for general reference only and may not accurately reflect the current course layout.
Hole 10
From elevated tees, the golfer has a good observation of the wide fairway in front. A lake along the left of the hole all the way to the green is very much in play on all shots. The second shot is further challenged by both a bunker and two trees on the right. The front right of the green is guarded by two bunkers. An elongated green with softer subtle green contours loom. Longer-hitters will be able to reach the green in two when playing downwind.
Distance

The aerial video is for general reference only and may not accurately reflect the current course layout.
Hole 11
This slight dogleg right hole plays uphill to the landing area and then downhill to the green. A large bunker guards the inside of the dogleg. Just in front of the green is a steep slope which will slow down running shots. The green features a high roll through the middle separating the back from the front with a bunker intruding into the left side.
Distance
The aerial video is for general reference only and may not accurately reflect the current course layout.
Hole 12
The golfer can see only part of the fairway before it drops away to the green. A steep slope to the left of the fairway will sometimes feed the ball back onto the fairway. Two bunkers on the right come into play for the longer-hitters. A small ‘blind’ bunker in the centre left of the fairway at 300m from the back tee will test the long-hitters. The green complex is framed by a stone wall behind the green and features various swales running through the green which will be testing when faced with longer putts.
Distance
The aerial video is for general reference only and may not accurately reflect the current course layout.
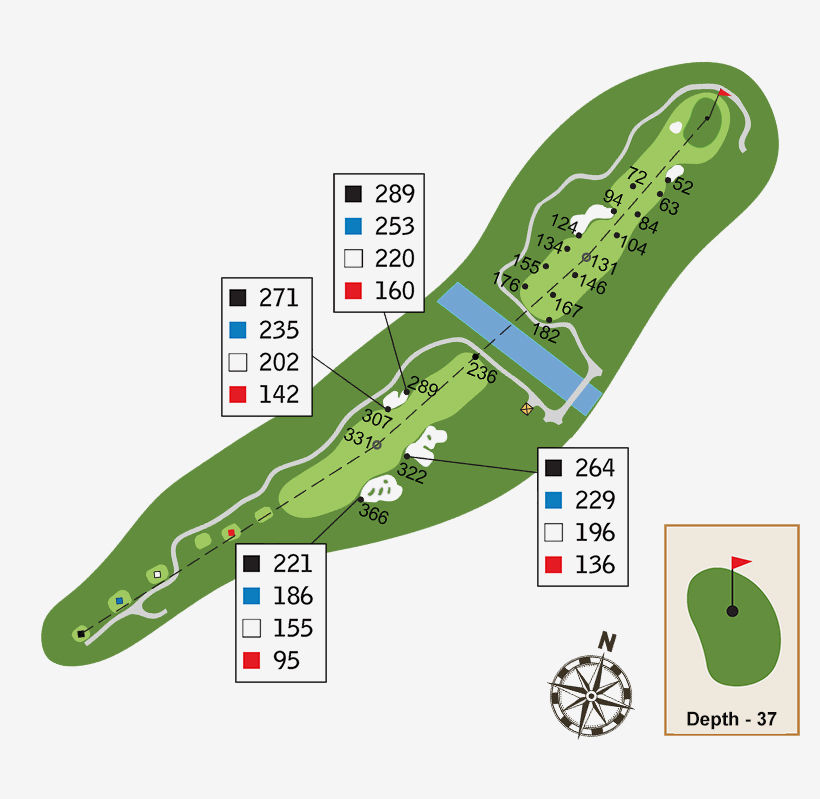
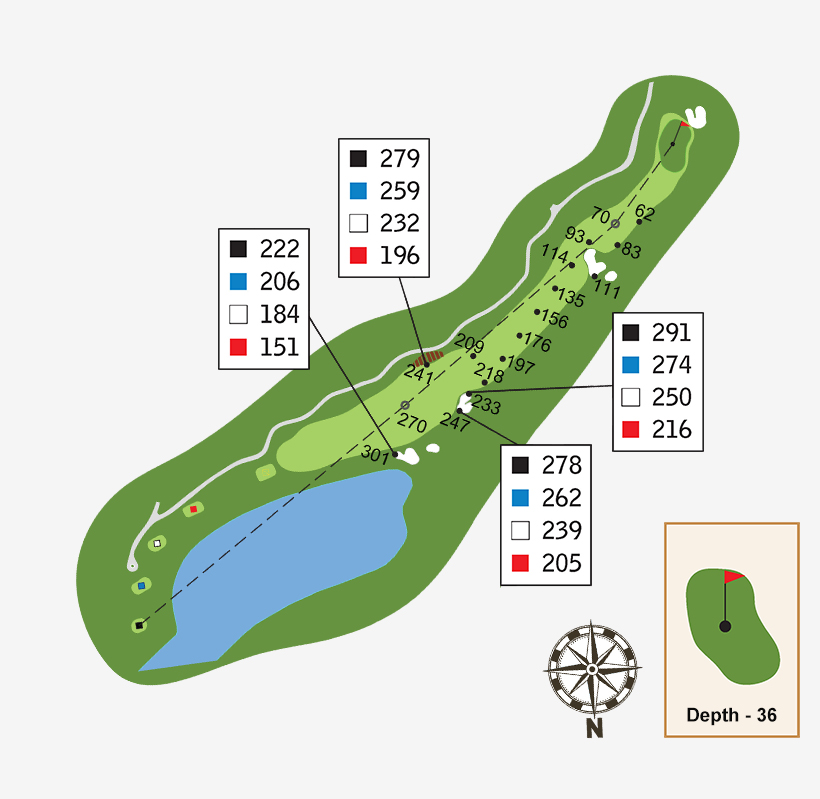
Hole 13
A dogleg to the right around a lake. The longer-hitters can try and carry as much of the lake as possible to have a very short second shot to the green in prevailing wind conditions. When hitting into the wind the shot needs to be aimed to the left however be aware of the fairway bunkers sneaking into play. The green is very softly undulating with the featured railway ties embankment flanking the outer perimeter. The right flag location is protected by a bunker.
Distance
The aerial video is for general reference only and may not accurately reflect the current course layout.
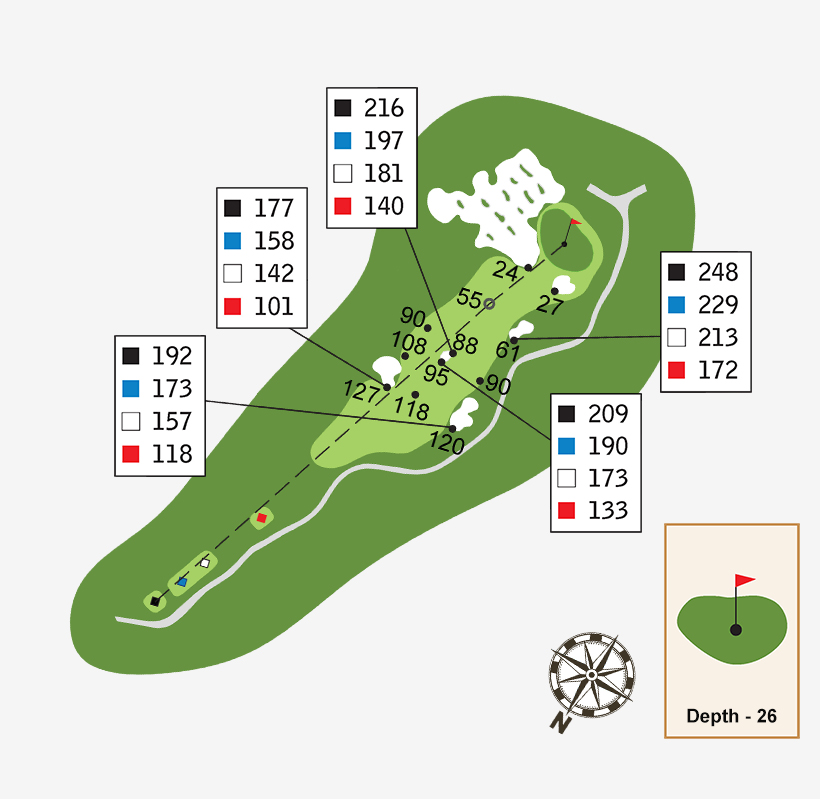
Hole 14
This green is roughly based on the old 14th green at the TMCC Garden course. There is a soft mound in the centre left of the green while the right side is gently sloped away. The bunker guards the right portion of the green. The front entrance into the green is raised while the shot that is a little strong will end up in a collection area behind the green.
Distance
The aerial video is for general reference only and may not accurately reflect the current course layout.
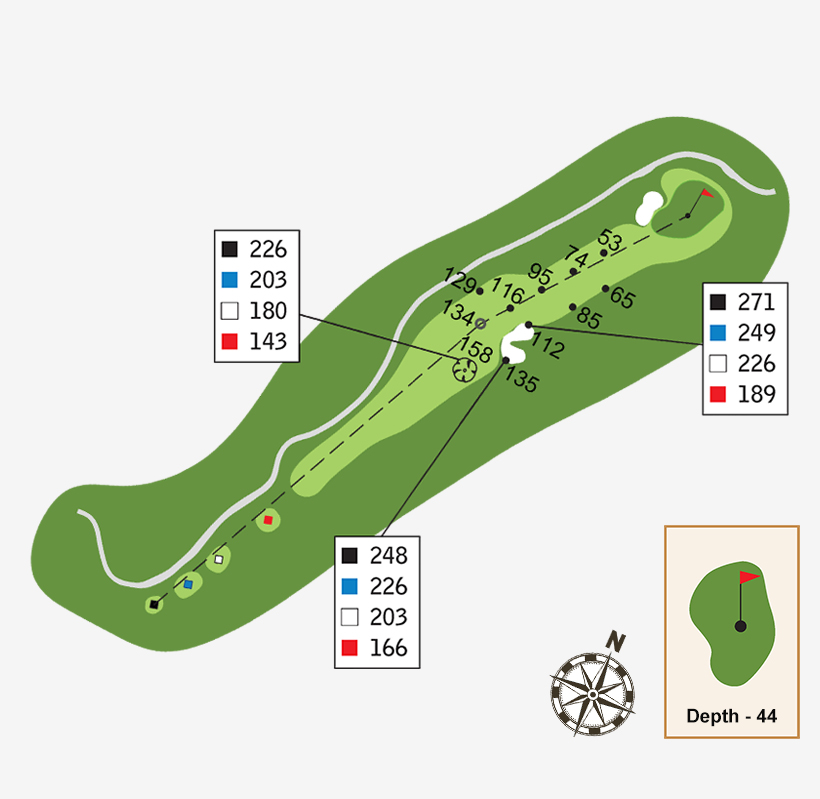
Hole 15
After hole 2 this is the other very long par-four hole on the course and plays in the opposite direction. Water is in play to the left of the fairway and a bunker to the right that will challenge the long-hitter. The green is raised up from the fairway and has a large bunker guarding the left front side. The green has two tiers and golfers can obtain a great view of the clubhouse and also looking down to the waterfall island green.
Distance
The aerial video is for general reference only and may not accurately reflect the current course layout.
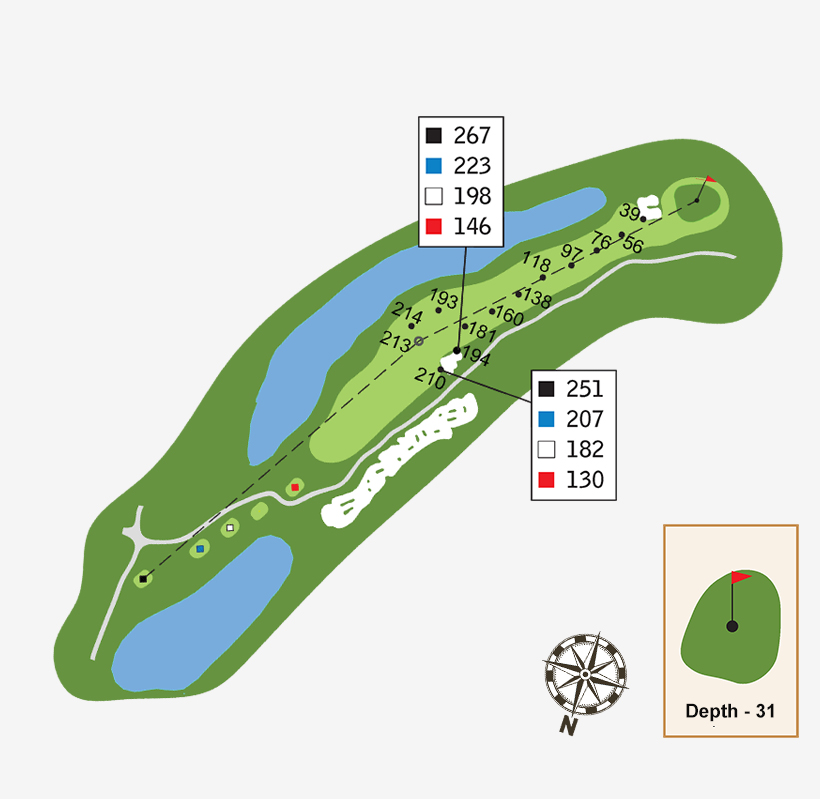
Hole 16
This is one of the feature holes on the golf course, with an island green and a waterfall nestled in behind the lake. With the largest green on the course it also combines subtle contouring that makes for testing pin placements. The green is framed by large rocks harvested from the old Tampines course.
Distance
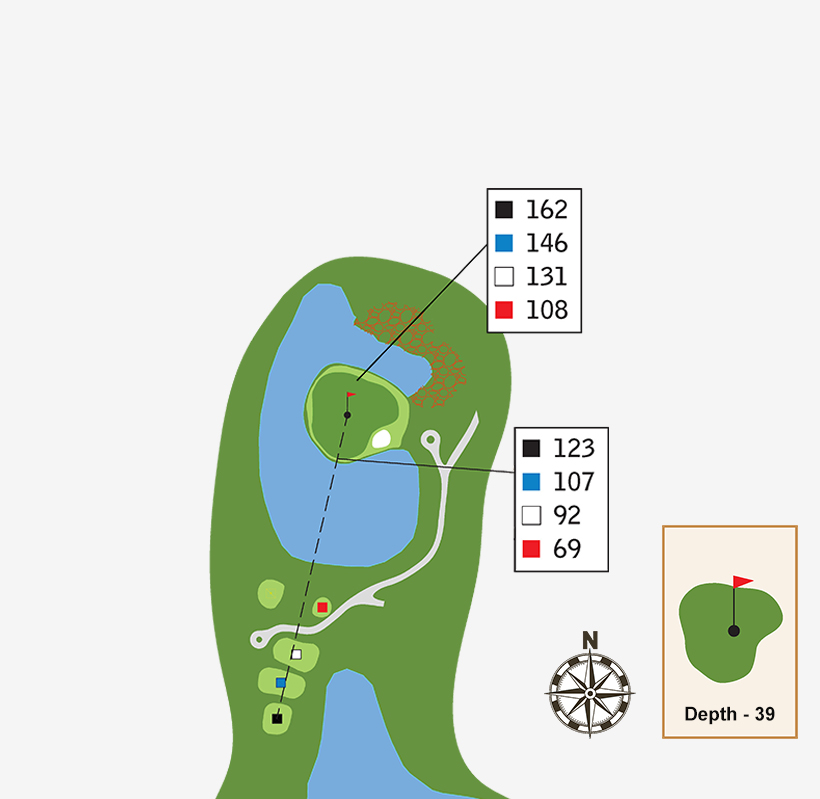
The aerial video is for general reference only and may not accurately reflect the current course layout.
Hole 17
Water is in play to the left of the fairway while a large bunker separating this hole and hole 15 will also be in play off the tee shot. The bunker features ‘church pew’ islands, which add to the interest and challenging effect. A small bunker on the left side of the fairway will challenge the long-hitter in downwind conditions. The green is guarded by a bunker front left of the green and comes in two-tiers with water to the right. Railway ties are presented within the mounding, over the back. The left side of the green, over the bunker, offers the most challenging flag location.
Distance
The aerial video is for general reference only and may not accurately reflect the current course layout.
Hole 18
From the back tee, this will play as a three-shot hole. However, there are six tees which will allow for many options when setting up for everyday play and major events. A lake to the left is in play for those who want to cut off this dogleg. Fairway bunkers to the right will come into play for most golfers depending on the wind direction. The fairway slopes from right to left. Beware of the cross bunker that will come into play on the second shot. The green offers interesting and challenging slopes and flag locations.
Distance
The aerial video is for general reference only and may not accurately reflect the current course layout.
Tampines Course Overview
